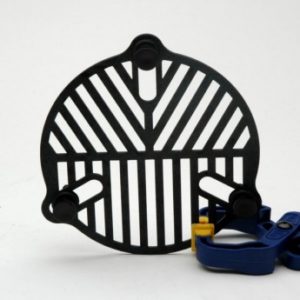
Bahtinov Mask
Auto focus software can significantly improve image focus; especially when images are captured over several hours during an imaging session. One of the biggest challenges of Astrophotography is making sure images are in focus.
Manual Focus Method
Most astrophotographers do their initial focus using a Bahtinov mask to perform the initial focus. The Bahtimov mask causes a de-fraction pattern to appear in the image of the stars.
The Bahtinov mask is placed over the front of the telescope while the telescope is pointed at a bright star. Short exposure images are then taken to assess the accuracy of the focus.
The following images show the defraction patterns for a star that is out of focus and the same star in focus.
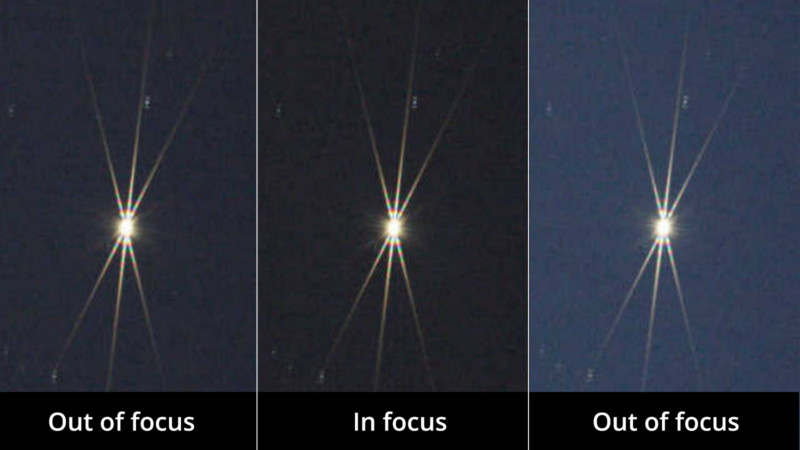 The difference is subtle. If you carefully examine the images you will notice that in the left image the vertical diffraction line passes to the right of the center of the X formed by the other two lines. In the right image it passes to the left of the center of the X. If you examine the center image you can see that it passes directly through the middle of the X. A Bahtinov mask is considered the Gold standard for establishing focus when doing astrophotography. Without the mask is is very difficult to tell if an image is at the best focus point.
Why Auto Focus?
Unfortunately, the correct focus point changes throughout the night because of the changing outdoor temperature. The only way to keep the images in focus is redo the focus several times throughout the night. This can be very time consuming because it usually requires moving the scope away from your target, pointing it to a bright star for focusing and then moving the scope back to the object you are imaging. Therefore a lot of time can be saved by using auto focus software.
Implementing Auto Focus
In order to use auto focus software the telescope focuser has to be controllable by your computer. Therefore the telescope need to have a software controllable motorized focuser. There are many ways to add this capability to a telescope. One way is to add a motor drive to your existing telescope focuser. Several manufactures sell kits to motorize various types of manual focusers. Another Approach is to replace the existing focuser with a new motorized focuser.
My Auto Focus Setup
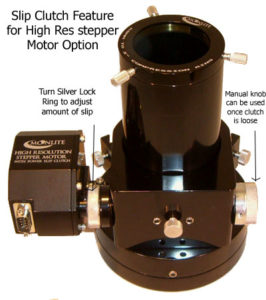
Moonlight Motorized Focuser
My telescope uses a Moonlight focuser like the one shown here. It has a precision stepper motor which enables the software to adjust the position of the focuser in extremely fine increments during the autofocus process.
I use a program called Sequence Generator Pro to collect my astro images. It can be used to fully automate a night of astrophotography, which can include multiple targets. One of the tools it includes is an autofocus routine.
In order to use the autofocus routine, the telescope must be fairly close to focus before the autofocus routine is run. This may seem counter-intuitive, but the primary purpose of the autofocus routine is to keep the telescope in focus throughout the night. It is not designed to focus an unfocused telescope.
How Auto Focus Works
The autofocus process requires some initial setup before it will work with a specific telescope and focuser. The user must specify the number of steps the stepper motor will move for each move for each focus adjustment. The user also specifies the number of points that they would like included in the focus curve (typically 9). The routine will then move the focuser out 5x the specified step change to collect the first point. It will then take a short exposure with the focuser at this position and make a calculation to determine the accuracy of the focus. The value calculated is called the Half-Flux-Radius, HFR. The larger the value of HFR the poorer the focus. The software will then move the focuser in by the specified step size, take another image and calculate the value of HFR. This process continues until the number of specified points have been collected.
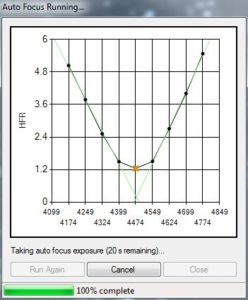
Plot of HFR Focus Curve
After the data has been analyzed two reqression lines are are plotted forming what is called a “V” curve. The point where these two lines intersect is the best focus point. The software will then move the focuser to this position and take another exposure to verify its result. If the calculated HFR is less than or equal to the lowest value of HFR measured during the autofocus run the focuser will be left at this position and the software will begin collecting images. If the value is greater than the minimum measured the routine will either repeat or utilize its sophisticated algorithms to select the best focus point. This can happen occasionally occur when the sky transparency is less than ideal.
The autofocus curve shown is from a recent imaging session of NGC 869 (Double Cluster).
The following image is the confirmation image from the Auto Focus routine. Click on the image to see the full size image.
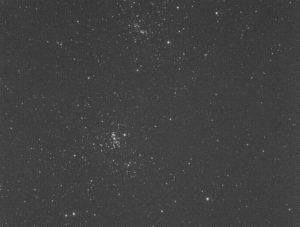
NGC 869 Raw Image (Click for full size image)